Sunday, June 21, 2009

First run off the "printing press" - the Beseler 23C II Condenser Enlarger that is

Getting hooked on photography is a bit like getting bitten by the golf bug. First, you spent way too much money to get your hobby started. Then you get on this train and at every stop you talk yourself into buying an extra photography gear or two, some you need, some you don't but you want them because you might need them....It is happening all over again....I used to spend eight hours on the green on weekends when I was doing my corporate gig, now, I am spending that same many hours shooting, processing and printing in my makeshift darkroom creating my photography/art :).


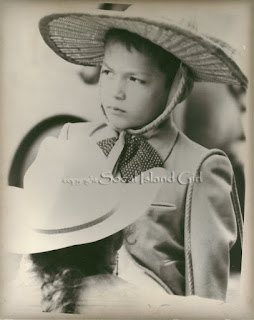
"f/5.6, 6 seconds, Grade 2 paper. Plus X 125 film, Canoscan 8400T scan"

This is going to sound a little crazy. I already own an Omega B66 b&w enlarger which I bought for $40 off CL 2 years back and have printed very successfully from it (after tweaking it and adding ND filter to increase printing time). Unfortunately, I am in the Bay Area for a couple of months without it and desperately wanted to print (my creative pursuit). I checked out what is left in the rental darkroom scene from San Jose to San Francisco, and decided that they are too expensive since they go by the hour or a combination of one time membership fee plus a reduced hourly fee. I much prefer the comfort of printing at home in peace. So, you guess it, I bought another enlarger off CL again. This time it is the Beseler 23C II (the earlier version with the blue condenser enlarger head). Paid $120 for it. Besides the enlarger, there were a nice timer, a safe light, 4 negative carriers including 4.5x6 and 6x6 beg carriers, extra 38mm and 80mm enlarging lens, an almost new Saunders 4 blade 11x14 easel, 10+ stainless steel developing reels and tanks, and "several hundreds" of dollars of old fiber papers from 8x10 all the way to 16x20, still in their boxes and sealed. If 1/10th of the papers were any good, I would have recovered more than what I paid for, and the Beseler 23C II would be a bonus!! There was also a box of Zone VI Studios Grade 2 papers in the pile, I understand they were the standard until Multigrade papers came along.


"f/5.6, #3 filter, Ilford Multigrade warm tone paper, 8 seconds, SPX 200, Canoscan 8400T scan"

So I proceeded to set up my makeshift darkroom. There were two windows and a door that needed to be light tight. I taped the windows with black plastic sheeting from Home Depot and created a temporary workbench for the trays by putting a 2x4 plywood panel also from Home Depot over two plastic cabinets. Bought a fresh developer and stop bath from Kaufman's camera, and they "donated" a piece of perspex for my contact print (it worked). Printing was done after sundown (now you see why I wish the sun would set sooner so I get a few extra hours of printing at night). After some experimenting, I was able to settle into the printing routine.
Join Cash Crate today to make extra cash

A few notes:
I used RC paper for contact print, at 3-5 sec increments, depending on the tone/contrast
After looking at the contact print, I decided to test print an image I shot at the recent Cinco de Mayo parade in San Jose on Zone VI Studio Grade 2. There was more contrast on the contact print than I wanted so I thought printing on Grade 2 paper would be a good compromise (I am still waiting for my filter pack to arrive). See the first image above of the young boy dressed in cowboy attire getting ready for the parade...the old Zone VI Grade 2 fiber paper probably gave the print its warm and aged look.....still experimenting....

The daisy shot (above) on the other hand was printed on regular Multigrade Fiber Paper with a #3 filter. When I looked at the contact print, it had nice shadows and highlights (the #3 filter was the only filter that came with the enlarger). I like the result, particularly the grain, which was very visible when enlarging to 11x14. I might add this was shot with Ilford Harman Infrared SPX200 (with orange filter). It was the first time I used Ilford SPX 200 and I love it. It has a nice soft tonal range and the highlights are a touch ghost white while the shadows are soft black, nice tonal range overall. Looking at how my scenics and still life turned out, I will definitely be shooting a lot more of the Ilford Infrared SPX 200 film.

Wednesday, June 17, 2009

Ansco Speedex/Agfa Medium Format Rangefinder

YouGov Polls - Get Paid To Give Your Opinions

Went at the Palo Alto flea market last Sunday, I was hoping the seller I bought my baby Yashica TLR camera from two months ago would be there this time. I remember seeing an old rangefinder that looked like an Agfa and he had wanted $50 then. (This was part of the lot of film cameras and saxophones he bid on at a Public Storage auction). Sure enough the rangefinder camera was there. It was an Ansco Speedex with Apotar 85mm f/4.5 lens, made in Germany in 1956 by Agfa for the US market. The body was a bit old, but the lens looked clean and shutter fired fine. I asked him what he wanted for it, hoping it would be less, he said $20 (he wanted $50 two months back). I offered him $10, "$15" he replied. I played with it for a bit, and said "what about $12, I am not really sure if this camera can be used for any serious photography". I had just told him that the Yashica I bought from him works ok but shutter speeds <1/30 are off (I am still working out the kinks). Anyhow, we settled on $12 and I was very pleased with my find, knowing full well may be this very old camera will not be up to the task and will be relegated to a place on my shelf and that is fine.


"Ansco Speedex 4.5"

Join Cash Crate today to make extra cash

To make the long story short, after returning home with it, I went online, did some more research, found tips on how to check for light leaks expected of old folder cameras. Basically, one shines a bright light into the bellow in darkness and see if there are any pinholes. If yes, try patching it with black fabric paint - a temporary fix I would imagine :(

OK. now the not so good news, yes, I found at least 7-8 pinholes which I fixed by painting them with black fabric paint from Michaels. The focusing lens also appeared stuck from lack of use which can be expected of old cameras but hey for $12, I can afford to work on it. I wrapped a towel around it and try to turn it a few times and after a few attempts, it moved. I then turned it counterclockwise and clockwise a few more times to loosen it and that did the trick, the turning became much smoother. Next, I wiped the lens clean with my camera lens cleaning fluid. Now the camera is ready for a roll of 120 film. Film loading is similar to any other medium format cameras and the Holgas, one moves the empty spool from right to left and insert the new film in the space on the right. However, it took me a long while to figure out that the rewind knob can be pulled up so the empty spool can be inserted, silly me. This was because the rewind knob was also a little stuck from old age. Sometimes the most obvious thing is not really obvious at all.

Voila, now the camera is ready to use. This is still a basic medium format rangefinder, nothing fancy but allows me a lot more control (shutter speed, aperture, focus) than the Holga (and no light leaks - I am keeping my fingers crossed that I have fixed all the pinholes). One's knowledge of the "sunny 16 rule" will definitely help here. I might add that I recently picked up a digital Pentax 1 Deg Spotmeter for $165 from a photographer in Mill Valley - definitely one of the best investments I made. I use it when I need help in determining the right exposure in challenging situations and for scenics, so with that I am ready to rock and roll with the Ansco/Agfa rangefinder :)

Pentax Digital 1 Deg Spotmeter
For various types of spotmeters available, check out selections at Bhphotovideo

Join Cash Crate today to make extra cash

What can I tell you, there are just a ton of great film camera bargains out there today if one looks for them. One does not need fancy camera to take good photography, just a good eye for composition and a feeling for the light. With so many digital cameras flooding the market, great film cameras have become orphaned and can now be had for a tiny fraction of what they used to cost. Film cameras often last you a lifetime, they never become outdated the way digital cameras do the minute you walk out of the store. When I was at Kaufman's camera in San Mateo recently to buy paper developing chemicals, they had jokingly asked me if I am one of the "hold-outs". To which I replied "definitely". I have not abandoned digital photography, it is what I do half the time and it has its place in the modern world. However, nothing can ever replace shooting with film, developing and printing in the wet room. It is a labor of love and much much more satisfying....The only analogy I can think of is perhaps crushing grapes from your backyard grapevines and making your precious bottle of wine?

If your entry into the world of photography has been by way of digital camera, then you must give film (b&w that is) a try, It is a very enlightening experience, a beautiful world in black and white and shades of gray with no distraction. The images are often powerful and they leave you lusting for more......

A good place to shop for used equipment is KEH.com


Monday, June 8, 2009

RawShooter software and a trip to the coast

Over the weekend, while on my second visit to Santa Cruz and Capitola, I made a series of shots of classic cars parked in the city square in Capitola. The end of the pier next to the Fish and Tackle shop were a dozen or so wooden canoes painted in red and blue....a colorful sight and I clicked my shutter away. A perfect day to be spending time in the popular seaside town, temperature was in the low 70s and light breeze in the air and sailboats in the harbor. We looked at each other and concluded that a glass of wine and lunch was in order. We proceeded to a restaurant with a view of the ocean and had a sumptuous lunch, the day could not be more perfect!!!


Softwares such as Photoshop, RawShooter, Topaz and Photomatix offer the creative photographer a mirade of tools to explore the boundaries of art and photography. (Click here to read my blog on HDR photography) A new software I recently added to my photo tool box is RawShooter. A standalone freeware that has sped up my post processing workflow tremendously. RAW files are displayed as thumbnails for quick preview and one can further group them into various priority folders for post processing or to send to Recycle Bin. Post processing has never been easier and adjustments made are saved as settings under "RW Settings" folder, leaving your original RAW files untouched. There is the usual "slide ruler" adjustment on exposure, saturation, highlight, shadow, saturation, hue, color temperature, tint much like in Photoshop. When you are done post processing the image, go to the "Batch Convert" tab and add your selected photos to the list. RawShooter will then apply your post processing settings to a copy of the RAW file and store the the processed image in a "Converted" folder in tiff format. Any changes you made are made to a copy of the RAW files and not the original which remains in your folder unaltered.


What a great software and it is FREE!! I have started reviewing all my old photo RAW files, giving it a spring cleaning and freezing up some much needed space on my external photo hard drive. Anyone who shoots RAW know how tedious post processing workflow can be, I highly recommend downloading Rawshooter as an alternative to Photoshop to speed up your workflow.